![]()
Viewing Form Information
After a form is created, you can view its information in the Forms folder. To view a form, follow these steps.
1. Access the folder that contains the form you want to view.
2. Click the form you want to view.
3. The View Form screen displays.
4. Click the Form Properties tab.
5. The following table explains the information on the screen.
|
Field |
Description |
|
Form Title |
Title used to reference the form |
|
FormID |
ID number automatically assigned to form |
|
Status |
The form’s current status |
|
Description |
Extended description for the form |
|
Form Data |
The type of form data: Mail or Database. |
|
Form Submissions |
The maximum number of times a user can submit the form. This is typically used with polls and surveys to limit one user’s influence over the results. |
|
Assign Task to |
Users and groups to whom a task will be automatically assigned whenever a site visitor completes the form. |
|
Content Properties |
Displays the properties of the form’s content |
|
Content Title |
Title of content associated with form Note: The content name is the same as the Form name. |
|
Content ID |
Content ID number assigned to content |
|
Status |
The status of the content |
|
Last Editor |
Last user to edit the content |
|
Start Date |
Date and time when content will go live on Web site (if set for future date) |
|
End Date |
Date and time when content will be removed from Web site (if set for future date) |
|
Date Created |
Date and time when content was created |
Viewing and Editing a Form’s Properties
To see and update additional form information that does not appear on the View Form screen, view its properties. To do so, follow these steps.
1. Navigate to the form’s View Form screen, as described in Viewing Form Information.
2. Click Form Properties ( ).
).
3. The Form Properties screen displays a subset of form information.
Title and Description
Database or Mail - if form data is emailed whenever a site visitor submits it, enter mail property information below. See Mail Properties
Autofill form values - checked by default, this allows the form’s fields to fill automatically when a logged-in site visitor has previously completed the form.
Limit Submission - when checked, you can enter the number of times a user can submit a form in the Number of Submissions text field
Assign task to - see Viewing Form Information
Form block’s ID number
Mail Properties
Mail Properties
|
Field |
Description |
|
To |
Email address to which the form is sent when submitted. |
|
From |
Text that appears in the email’s From field. See Also: Retrieving email Address from the Submitted Form |
|
CC |
Text that appears in the email’s CC field. See Also: Retrieving email Address from the Submitted Form |
|
Subject |
Text that appears in the email’s subject field. See Also: Retrieving Form Data Into the Subject and Preamble Fields |
|
Preamble |
Beginning text of the email. See Also: Retrieving Form Data Into the Subject and Preamble Fields |
|
Send data in XML Format |
A green check means email data will be in a structured XML packet. A red X means the email data will be in a standard mailto format. For more information, see Sending Data as XML. |
Retrieving email Address from the Submitted Form
In the Mail Properties section of the Edit Form screen, you can select email addresses submitted on the form to be inserted into these Mail Property fields:
To
From
CC
So, instead of entering a static email address, it can be dynamically retrieved from the user’s form submission. For example, you want to retrieve the “from” field of an email from the information a user enters when completing the form.
To do this, use the OR to addresses in field dropdown lists circled below. These lists contain fields that dynamically retrieve data from the submitted form.
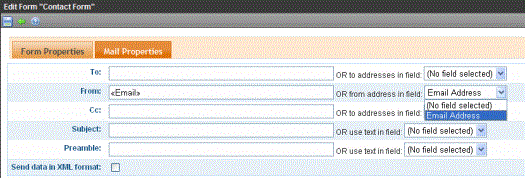
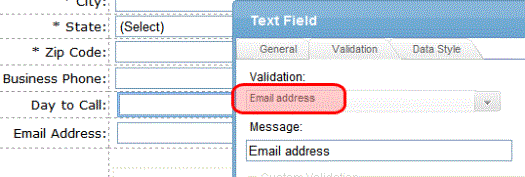
Note that the To and CC fields can accept fields whose validation type is email address or email address list. On the other hand, the From field can only accept fields whose validation type is email address (that is, a single email address).
To set this up, follow these steps.
1. Add a form field whose Validation type is Email address or Email address list . The field prompts the user completing the form to enter his email address. Label the field something like Enter your email address.
Note: If the field allows more than one address, add on-screen instructions to separate each address with a semicolon (;).
2. Go to the Edit Form screen > Mail Properties section.
3. Move to the field labeled From:.
4. At the dropdown list following OR to addresses in field, select the field you created in Step 1.
Now, when a user completes the form, the value he enters in the field created in Step 1 is used for the email’s From address.
Retrieving Form Data Into the Subject and Preamble Fields
You can retrieve data from a submitted form directly to the form’s Subject and Preamble fields. (The subject is a standard mail field, and the preamble is text that appears at the beginning of the email.)
For example, the form may provide a list of your products. While the user is completing the form, he selects a product that he is interested in. The product then becomes the subject line of the email.
Note: Since a Textarea field can span multiple lines, it can only be used with the preamble. However, a plain text field can be used with both the subject and preamble.
To retrieve data dynamically from a form field into the email’s subject line or preamble, follow these steps.
1. Add a form field that collects the information you want to insert into the email’s subject line or preamble. See Also: Adding a Field to the Screen
2. Go to the Edit Form screen > Mail Properties section.
3. Move to the field labeled Subject or Preamble.
4. At the dropdown list following OR use text in field, select the field you created in Step 1.


![]()